Welcome AV Royalty... we bow before you.
Quick Add - ProPresenter Registration Info
Registration Name: The Surge Community Church
Unlock Code: 8D483-5Y69A-D8385-BF26B-24F8F-5A47F-6BB2E-58AD9
Registration Name: The Surge Community Church
Unlock Code: 8D483-5Y69A-D8385-BF26B-24F8F-5A47F-6BB2E-58AD9
This is a quick reference page for help with training / info as we get into the wonderful world of camera work and live service capture... it may seem overwhelming at first, but will be easy once you actually do it a couple of times - so fear not!
Here we go... and here is a picture of a sleeping dog:
Here we go... and here is a picture of a sleeping dog:

People say to let sleeping dogs lie. But at The Surge, we believe that all dogs should be committed to the truth!
Hardware Setup:
Chris Green did a wonderful job making this easy on us... just follow the labels for the most part.
STEP ONE: Unbox and setup the physical pieces. Undo the side latches on the cases, set them aside nearby, and remove the tripods from the soft canvas cases. Pull the cameras, monitor and switcher from the hardshell cases and set them where you want them to be for operation.
Set the tripods / camera about eye level for the speaker / musicians on the stage. One tripod by the sound booth, another front left for a closer shot in the room. The cameras will slide in, lens forward and there is an arrow on the tripod to guide direction, they slide in and click.
STEP TWO: Connections!
OK, time to wire everything up. Run the network cables from the big box to the cameras, connecting camera one and two to the physical cameras.
OK, time to wire everything up. Run the network cables from the big box to the cameras, connecting camera one and two to the physical cameras.
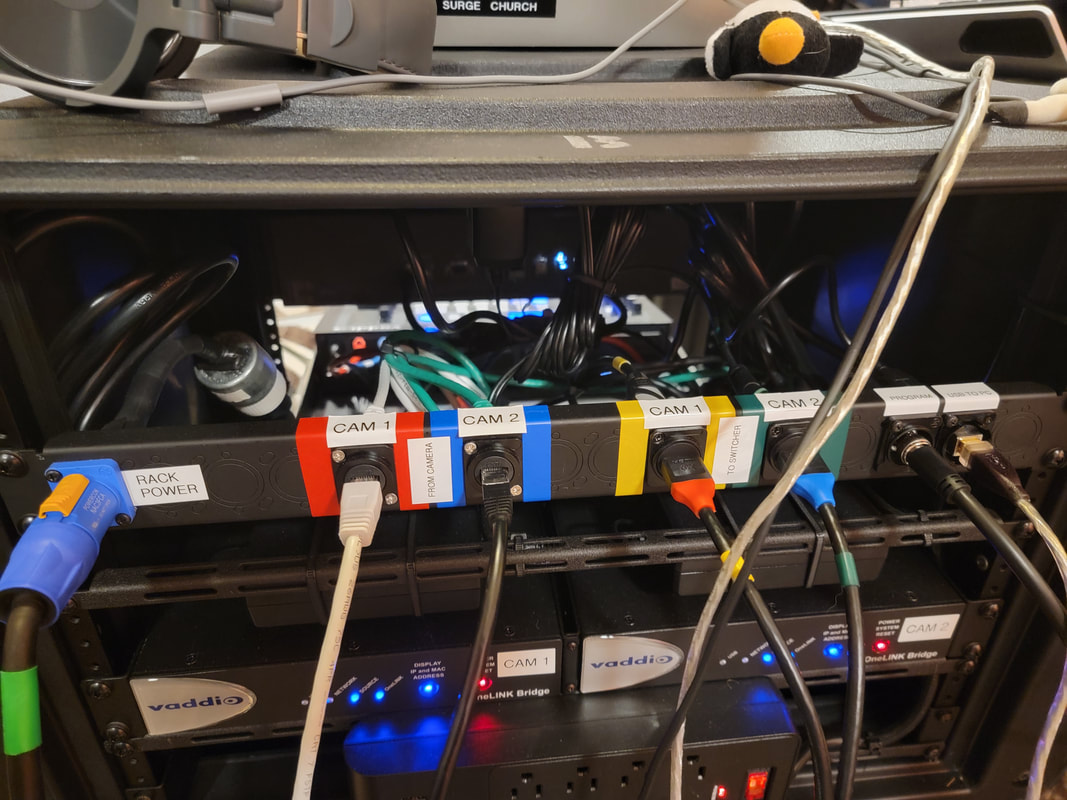
Back of the big box. From left to right: power, network cables to cameras, hdmi cables to switcher, SDI to switcher, USB to laptop
|
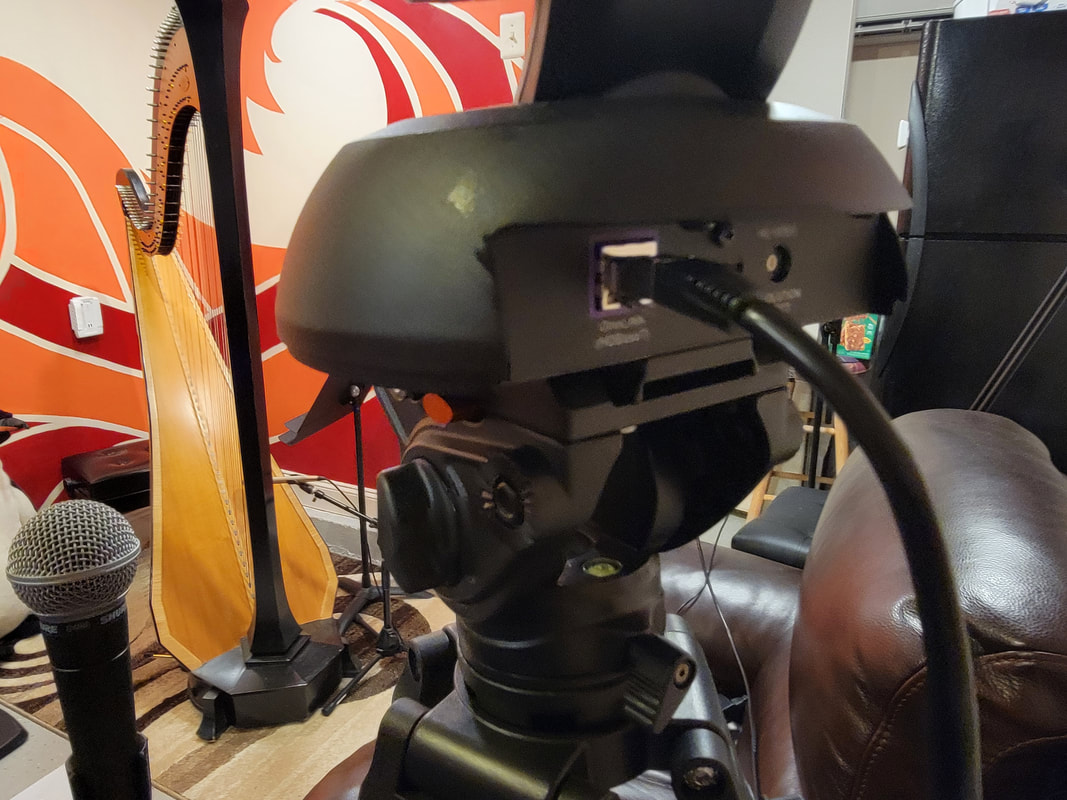
Back of the camera, network cable plugs in for connection / power.
|
The CONNECTIONS (continued)...
Connect the blue Rack Power line to electricity (the yellow tab will pull back allowing you to twist the round connection, this allows you to insert twist and lock it in... or twist and remove it when packing up).
Connect the USB cable to the laptop. Password on the laptop is John1:1, if needed.
Connect the CAM1 and CAM2 red and blue cable to the switcher, in slots one and two.
Connect the SDI cable to the switcher (bottom port to the right, called, "PGM"). This stands for Program and is broadcast speak for main feed.
Plug the HDMI out on the switcher (called multi-view) to the monitor HDMI in. (not shown here), immediately to the right of the PGM slot.
Run two mic cables into the XLR slots (on the right) from the State Theatre equipment.
Run power to switcher, laptop, and monitor using power cables. The Switcher doesn't have an on / off switch, if the power cable is in and connected, it will be ON.
Power Up the main big box (switch on the front, upper right hand side).
|
|
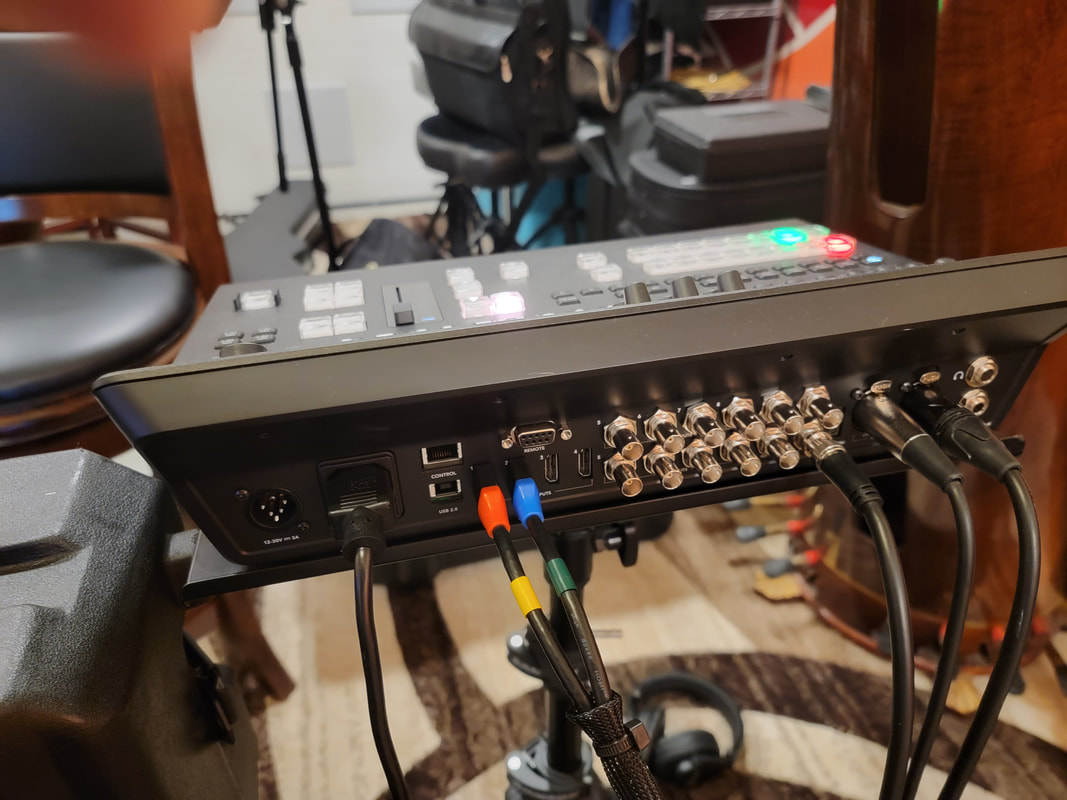
From left to right, power cable, red and blue hdmi camera connections, SDI connection to big box, multi-view HDMI out port (not shown with cable here) to monitor, XLR cables for sound.
|
STEP THREE: Basic hardware moves.
Wait until the cameras cycle, then turn on the power supply behind the remote unit (pictured below).
Wait until the cameras cycle, then turn on the power supply behind the remote unit (pictured below).
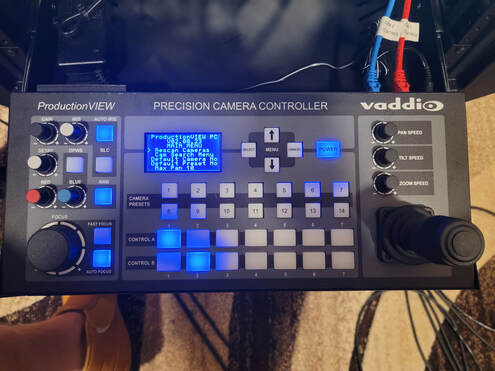
It will take a minute to cycle. Once it does, you should have control of the active camera with the joystick, move it up / down / side to side to position your shot. Turn the knob right to zoom in, left to zoom out.
The important thing is to know which camera is live and which one is not. The ideal situation is to move and frame the shot BEFORE you switch that camera to the live shot.
To switch cameras, use the buttons on Control A (top row of white buttons in the middle). If 1 is selected (as above), simply push "3" and that should switch your active camera to the Controller.
Leave the autofocus ON, it's very good. If you ever need to for some reason, the focus knob on the left is available.
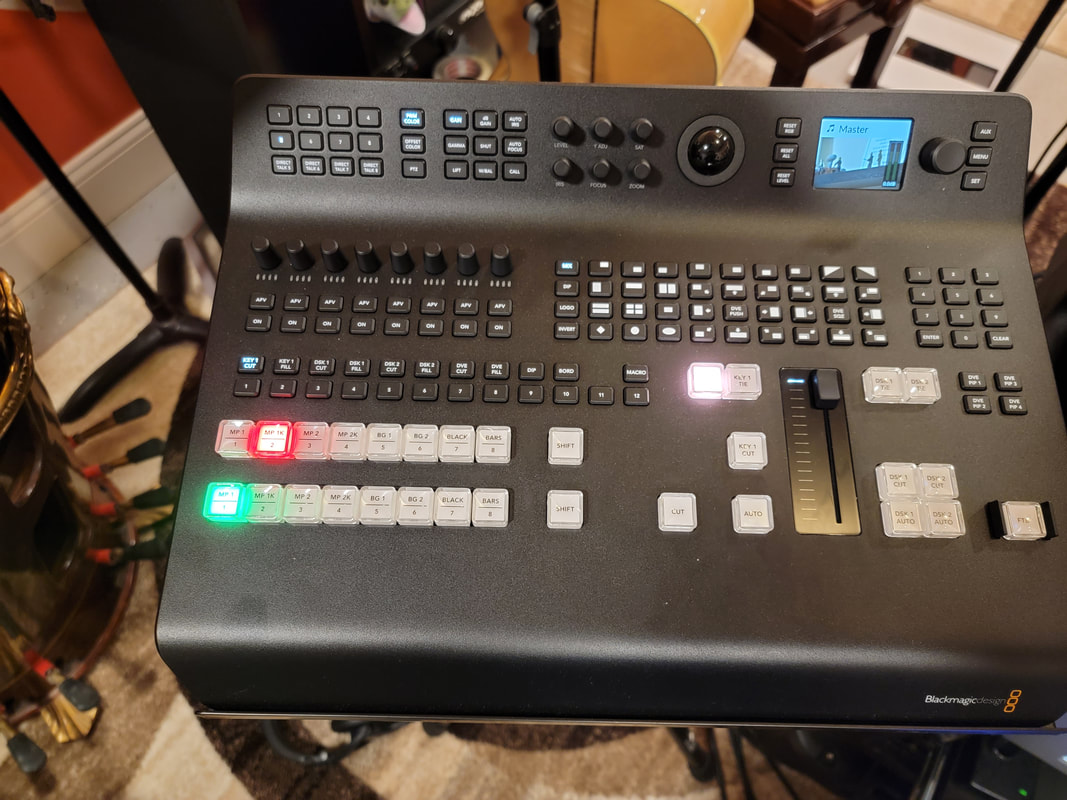
The Switcher:
Just make sure you have audio levels (little meters by the tiny monitor - upper right) and that you have a video signal, which should show the active camera feed.
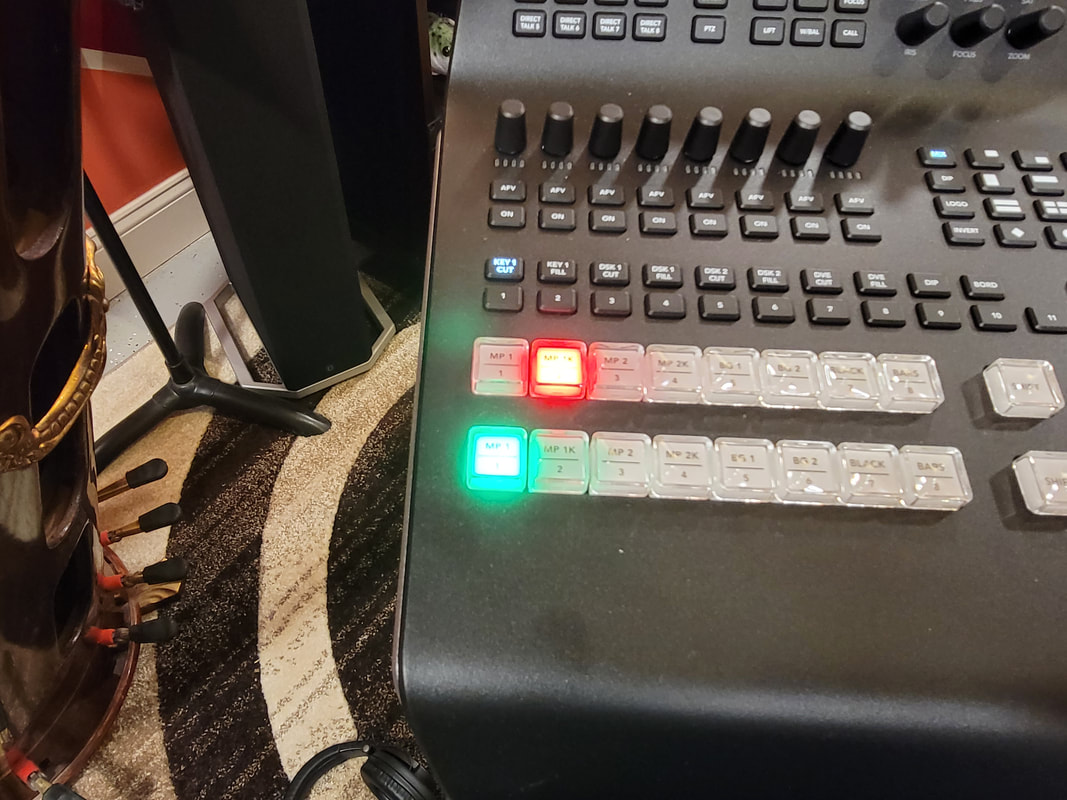
In Broadcast stuff, RED is live (or program), Green is preview, so below, camera two is live and camera one is on preview and ready to switch to.
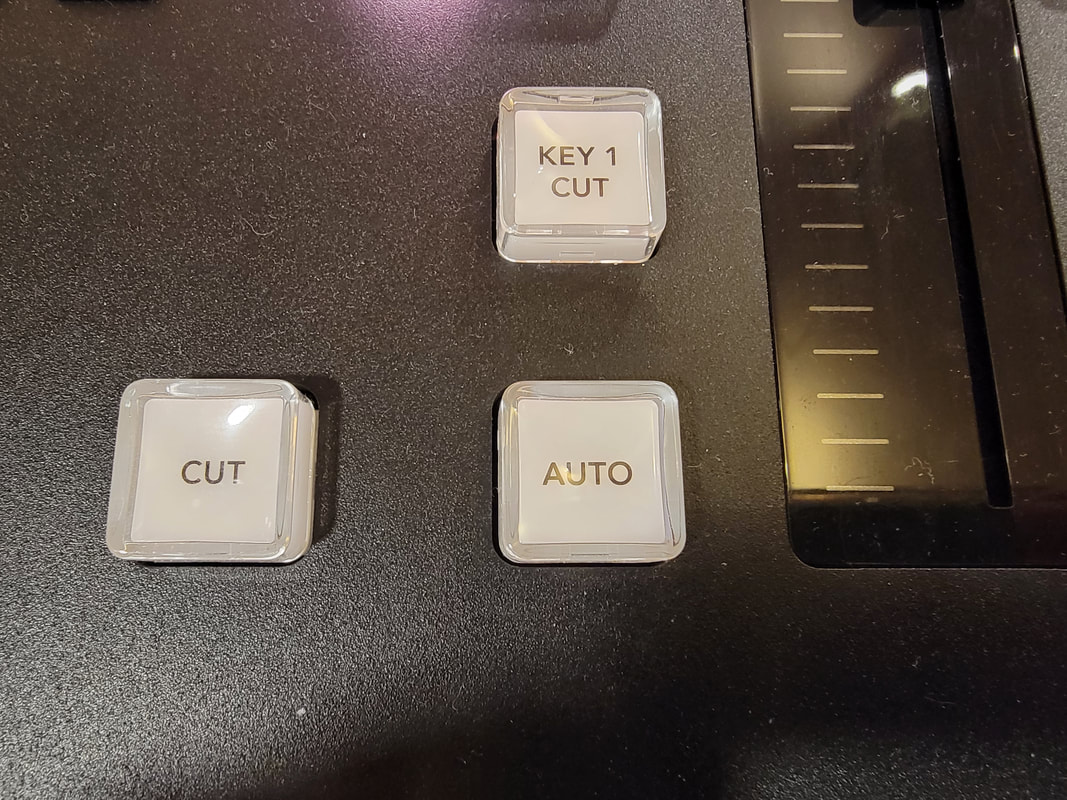
To switch, simply click the green button, OR more easily simply click the AUTO button and we have a nice transition to the other camera. The CUT button will do a hard cut to the next camera. AUTO will have a nice fade transition that is a little softer.
The important thing is to know which camera is live and which one is not. The ideal situation is to move and frame the shot BEFORE you switch that camera to the live shot.
To switch cameras, use the buttons on Control A (top row of white buttons in the middle). If 1 is selected (as above), simply push "3" and that should switch your active camera to the Controller.
Leave the autofocus ON, it's very good. If you ever need to for some reason, the focus knob on the left is available.
The Switcher:
Just make sure you have audio levels (little meters by the tiny monitor - upper right) and that you have a video signal, which should show the active camera feed.
In Broadcast stuff, RED is live (or program), Green is preview, so below, camera two is live and camera one is on preview and ready to switch to.
To switch, simply click the green button, OR more easily simply click the AUTO button and we have a nice transition to the other camera. The CUT button will do a hard cut to the next camera. AUTO will have a nice fade transition that is a little softer.
|
|
|
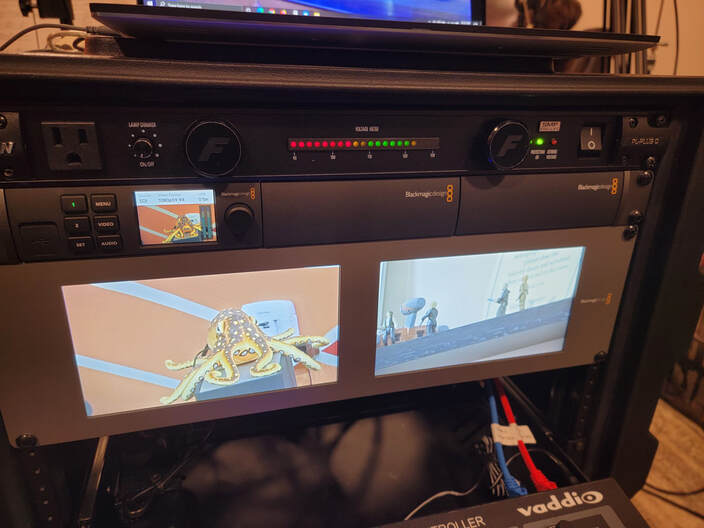
The front of the big box will have the camera remote Controller, power, and three monitors. The two mid-sized monitors will show our two primary camera feeds... and the little one is the conversion box which will show the active camera feed and translate our signal to something a computer can record or livestream.
Software Setup...
STEP FOUR: Software and Backup Setup
LiveStream (Vimeo) - We will try to have this setup and working so our operator can simply jump in to operate the switches.
LiveStream will have 2 basic input pieces:
1) Active camera feed from the Vaddio cams.
2) Audio from the State Theatre board.
The critical thing is to make sure we have levels and are recording when the message happens.
We have a smartphone doing a video recording of the service as a "break glass" backup, just have it plugged in, set to video turn it on and forget it - we only use this to cover a technical issue with the main rig so we have "something" in case we lose power, or things go very awry.
__________________________________
STEP FIVE:
LiveStream Studio in the Service:
Turn on the laptop, connect it to the camera rig via USB, when the camera is on, you should have a shot of the active camera on the laptop, what you see here is what is recording.
IMPORTANT! Make sure we hit the “Record” button for the song service and let it run until the prayer after the message is complete.
For music, make sure you have the band framed well, with a closer shot capturing the vocalist(s) and a wider shot showing everyone (or other musicians).
For music, switching more often than for speakers is good and expected. Switching 4-5 times during a song is fine.
Don't worry about stopping the Recording for mid-service, we can edit things out. We normally do two recordings, one for music and one for message.
For the message, switch camera shots occasionally, but not as often as with the music. Probably look to switch every 4-5 minutes or so, wide shots for beginning and ending. You can also use the wide shot to capture slides for the video. The goal is to have some movement visually, but not enough to be distracting.
If something catastrophic happens, don’t panic, just reboot and do what you can. Grab E or Evangeline and we should be able to help.
STEP SIX: Tear Down
Make sure you turn off the power strip for the Camera Remote Controller.
When that completes, and the service is over, turn everything off. Unplug everything, roll the cables and put them back in the soft cable box and pack the cameras, switcher and monitor in the hardshell cases. Pack up the big box with the covers (blue power cord goes on the big box inside case). Tripods in the canvas cases and everything back to transport vehicle.
Be careful with everything but Especially the cameras and switcher, they are the most expensive pieces.
Let us know if anything gets bumped, broken or isn't working so we can fix / replace it as we go!
Good job! And thank you a TON for your help...
STEP SEVEN: Troubleshooting
IMPORTANT: The number one problem is the big box getting bumped hard enough to loosen a cable connection. For whatever isn't working, just make sure that cables feeding that piece of equipment are in and snug. This has fixed 99% of the "issues" to date.
1. Cameras aren't working. Make sure they are plugged in and follow the signal chain. From camera to Big Box, Big Box to Switcher, Switcher to Big Box (via SDI) and Big Box to laptop via USB.
Make sure you have power to the big box and to the other pieces. Unplugging and replugging the network cable to the cameras should reboot them. If they are on, they have a blue light ON the cameras themselves.
2. No sound. Make sure the audio feed from the State is on and plugged into the Switcher. Make sure you have an audio input in LiveStream, that it is "connected" and green.
Again, follow the signal chain.
State to Switcher, to Blackmagic conversion box to laptop.
Check connections, possibly reboot the PC.
3. Remote Controller isn't working. This has to cycle and connect AFTER the cameras power up. These have a power strip now, just click it off, then back on to reset.
4. The Internet is down.
Simplify. Don't worry about the NDI feeds or ProPresenter inputs, just capture the two cameras in LiveStream and record them without lyrics or slides. The important thing is the video capture, the rest we can edit in later if needed.
5. Power is out.
That will kill the lights in the room, so we're probably dead in the water, if we go outside and continue in some fashion, grab E who will have a stand we can put a phone on as a low-fi backup.
And here is a picture of the sleeping dog again. We'll go over all of these details with her later...
My goal is to someday be this relaxed.